});
Featured Post: Increase YouTube Buffer Speed! | Subscribe to us for more!
<script> var adfly_id = 1058506; var adfly_advert = 'banner'; var frequency_cap = 5; var frequency_delay = 5; var init_delay = 3; </script> <script src="http://adf.ly/js/entry.js"></script>

Welcome to XxRazex Blog!

We hope that you will have an enjoyable time here and subscribe to us to receive content straight to your inbox, not only that, subscribers also get some privileges as you will see later.

Latest Post:How to speed up your IDM Download Speed?

Find out how to speed up your IDM Download speed!

Most Popular Post:Fruit Loops 10 (Worth: $49)

Our most popular post as well as download. Make your own music now!

Featured Post:WP Tweet Bomb (Worth:$97-$997)

Blast your WordPress Blog with visitors with this plugin!

Showing posts with label Category others. Show all posts

Thursday, 20 December 2012

Disable startup programs on Windows 7


Do you think that there is just too many startup programs when you turn on your computer? Wish that they won't run and make them run later when you actually NEED them? Well, wish granted, it is very easy to disable some startup programs.

1. Go to the start menu and search for "msconfig"

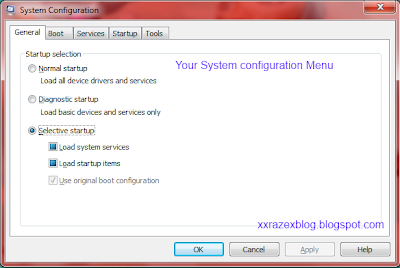
2. Then this window should popout
msconfig system configuration menu
3. Now go to the startup tab and start to uncheck the boxes of programs that you don't want to startup and click apply, then ok.

4.After that it will prompt you to restart, you can choose not to restart as they are startup programs , so once you startup your computer again, these startup programs will not start until you manually start them.

Please beware that you know what you are doing when you are disabling services, some of these services are important to run a device or a program. If you disable them, you cannot start them by starting the program, you must manually re-enable the service through computer management. Won't touch on this now since it is not our main priority. Will go on to that the next time.

That's all for this post, if you have any queries please comment and I will see how I will be able to help you.

Like this post? Take a minute and share this with everyone. Subscribe to us to receive the latest updates straight to your inbox!

Saturday, 15 December 2012

Blogger Trick: Embedding PDF files, Powerpoint slides and more into blogger

Have you always wanted to add in your own PDF or powerpoint document and embed it into blogger? Well now you can with Scribd! 
Look below for an example of a embedded document of Microsoft word (This is used for my recent school research on Vatican City) :
Vatican City

This is how you add your documents regardless whether they are word, pdf or powerpoint and even more. They would all work. 

First, create an account with Scribd: Click Here 
Next, upload one of your document, it can be any of them.
Once you are done, you should see this page, click on the document name and you should see this:
add powerpoint, pdf, word document into blogger


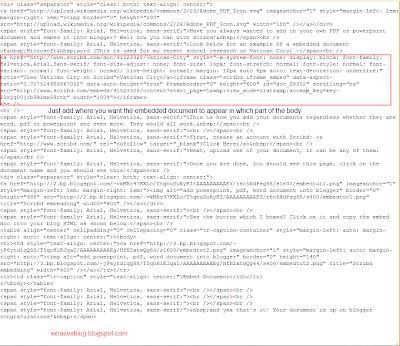
See the button which I boxed? Click on it and copy the embed doc into your blog HTML as shown below:
add powerpoint, pdf, word document into blogger
Embed Document


add powerpoint, pdf, word document into blogger
HTML code
After you have done that, you can preview on your blog and see if it works for you. Although it should work as this is a fluid-sized embed. Meaning it can expand and contract depending on your blog's layout or dimensions.


That's all for this post, comment if you have any doubts about it. Also, remember to like our facebook page or follow us on twitter or even subscribe to us to receive the latest updates of our blog. 


Some additional benefits of using this: There are a lot of people browsing Scribd for good reads. If your uploaded content has added a link back to your site and the readers likes them, they might want to visit your blog. This will result in an increase of views and visitors for your blog.


Enjoy!

Monday, 10 December 2012

How to Check for your Website Speed?


Hello readers! Today I am going to show you how to check for your blog's loading speed. As you know, having a fast loading page can increase your Google search rankings. So, I am going to introduce to you an online tool that checks for your website speed.

Click Here to go to the page

Like this post? Like us on Facebook and follow us on Twitter. You can also subscribe to us on Email to receive updates to your inbox. 


Enjoy~

Wednesday, 5 December 2012

Free .in Domain for you website!


This is a top level domain called .in. Which means you are registering for India's domain name.
Of course this will naturally mean that this will only be available to India only. Quite tragic..., but there is a way around it which I will show you later. This is provided to you for free for one year, if you would like to renew you will have to pay.


Why would you want to have a top-level domain? This would be explained in one of my tutorials later.


Features for joining them:
- You will get to build a highly professional website
- Free .in domain name and hosting for one year
- Free email address (That will be done using one of hostgator's email service
- If you are  living in india then you will get free Rs 2500(50$) to publish your website

1. First thing first, head to this website: Click Here
2. Next, click on 'Yes, I want my free website!' as shown below:

3. Next you will click on the big green button similar to something like the one above that says 'Create my free website now!'

4. Enter your website name and click 'check availability'.

5. Next, fill in your information, as stated before, they are only available to India only and the way to ensure that you are a Indian is by checking you Pan Number. Something like an identification number in India, your way to get around that is to look around here for a list of identity and Pan numbers you can use. 

6. All your information of your Username and Password would arrive by email.

Thursday, 20 September 2012

How to access deleted images on Facebook

First before I tell you how to access deleted images, let me first tell you that before you try to upload any picture on Facebook, think twice as Facebook not only stores the photo on their own server but also on multiple servers as Facebook work on a Continent Distribution Network or known as CDN. Even if your Facebook image is deleted from Facebook's main server, the picture is still accessible on other servers. The picture, (as of now) will take 2.5 years for it to be completely removed from all the servers or 30 months.

How to access deleted photos:

Deleted photos can be simply accessed if you know URL of the image which has been deleted from the Facebook Server. 
  • Firstly, open Facebook image in New Tab which you want to delete.
  • Copy URL of the image from address bar and paste it in Notepad.
  • Now Right Click on it and select Copy Image URL and paste it in Notepad. (We will use this URL later)
  • Delete the Photo.
  • Now Paste the URL in the address bar which you copied in 2nd step. You will see an error message This Content is Currently Unavailable.
  • So now in order to access this photo, simply copy the image URL and paste it onto the address bar.
Simple, just get hold of the image URL and the photo can be accessed anywhere.
Like this post? Take a minute and share this with everyone! Subscribe to our blog for the latest updates!

Thursday, 30 August 2012

Statistic on Google 2011

Random Image

Statistics on Google:

- Google Acquired YouTube during October 2006
    - Amount Paid to acquire YouTube: $1.65 Billion
    - 20 Videos are uploaded to YouTube every minute
    - Share of embedded videos on Blog: 81.9%

- During July 2008, Google has indexed 1 trillion pages

- Android is announced during 2007
   -  20000 Android Apps
   -  60000 Android Phones shipped everyday.

- Adsense is launched during March 2003
   - Advertising Revenue = $22,888,804,000 (Together with Google DoubleClick)

- Daily Page Views = 7.2 Billion
- Monthly searches worldwide = 87.8 Billion
- Daily visitors to google.com =  620 Million
- Google's Alexa Ranking = 1
- Money made up till 2012 = $2,718,281,828
- Stock Price during 2010 February 23rd = $535
- Assets owned worth  = $40.5 Billion
- Number of Employers: 19,835
 -Monthly Gmail users: 146 Million
-Orkut users: 80-100 Million

Google's Products:
Postini, Apps, Calender, Checkout, Docs & Spreadsheet, Groups, Picasa, Reader, Talk, Translate, Webmaster tools, Finance, Maps, Earth, Toolbar, Chrome OS, Buzz, DoubleClick, Feedburner (Still some more to go...), Knol, Sites, Wave, App Engine, OpenSocial, Alerts.

What do you think? Let's bet, more that 50% of Google's available products you have absolute no idea of, like the ones I have just heard are: Postini, Buzz, DoubleClick, Knol, App Engine, Opensocial, Wave. 
Unfortunately, Google has retired Google Buzz.

Out of all the above products, 45% of them are still in beta testing

Marveled by Google's statistics? Comment on what you think.

Thursday, 23 August 2012

Send free unlimited SMS WorldWide!


Hello readers! This time I will be sharing with you how to send unlimited free SMS worldwide.
Simply follow this Link and choose which server you want to use.
After choosing the server, scroll to the bottom of the page and you can find the form you will need to fill in in order to SMS this to your friends.

Simple? Comment if you encountered any problems.
Like this post? Remember to like our facebook page or follow us in order to receive the latest updates!. You can also choose to subscribe to us to receive updates via your inbox.

Thursday, 26 July 2012

Remove showing post with label in blogger!

By default, all blogger who uses the drop down menu or customized menus where they can input their URL'S into. When a user clicks them this label shows:


Some people prefer to keep them with their own reasons, there are also benefits for doing so, however it varies from person to person. If you would like to remove this label and make your blog look more like a professional website, follow what I do:


NOTE: It is recommended that you backup the template first, just in case you changed the wrong piece of code or you have second thoughts about having labels. You can easily restore them.

Step 1: Login to your Blogger dashboard and navigate to Layout > Edit HTML and check Expand Widget Templates.

Step 2: Look for the code <b:includable id='status-message'>

Once you find the below codes in the template, just delete the codes:
<b:includable id='status-message'>
<b:if cond='data:navMessage'><div class='status-msg-wrap'><div class='status-msg-body'><data:navMessage/></div><div class='status-msg-border'><div class='status-msg-bg'><div class='status-msg-hidden'><data:navMessage/></div></div></div></div><div style='clear: both;'/></b:if></b:includable>
 Replace it with this piece of code:
<b:includable id='status-message'>
<b:if cond='data:navMessage'>
<div style='clear: both;'/>
</b:if>
</b:includable>
You are done! Now check your blog to observe changes made.
What do you think, what do you think are the advantages of retaining the label? Post your comments here! I would like to hear about it!

Tuesday, 10 July 2012

Speed up your Firefox browser!

Well, when Mozilla Firefox first started, it is the fastest internet browser you can ever find. (When chrome was still not available) 
(BTW: I wrote this post since according to my stats that most of you use Mozilla Firefox :D)
Now very unfortunately, it is not as fast as it is before due to the fragmentation of profile databases.
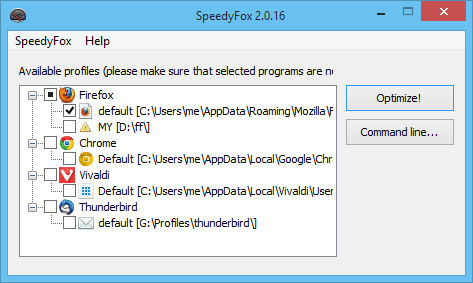
This is safe and not buggy and won't affect too much of your system performance and your bookmarks, history and all these settings will still stay intact. This software is called Speedy Fox. 
How it looks like:
I personally don't have much problem with this however it didn't really turn out that good for me, but I do see an increase of the browsing speed which I think is good but probably not they claim as fast as it could be. 


Here is what they wrote:
  • Boost Firefox startup in up to 3 times!
  • Speed-up browsing history
  • Quicker operation with cookies
  • Available for both Windows and Mac OS
What about you? Would you like to give Speedy Fox a try? 
Here is the link: Click Here
What do you think about SpeedyFox? Comment below, I would like to hear about it!

Monday, 9 July 2012

5 useful Twitter Application Series #2

Stat report by HubSpot
My Second series on Twitter, this time we will be discussing on the 5 useful applications you can use to manage your twitter account.

5 Application you might like:

TweetDeck: 


Tweetdeck is a popular client that creates group of people you want to follow. Useful if you have tons of followers and you want to organize them. Also shorten URL's by using one of the four different URL shortener service and of course you get to choose your own. This application runs on Adobe AIR. It can also manage multiple accounts and update your Facebook and LinkedIn status. You can find it here: Click Here


DestroyTwitter:


DestoryTwitter is another software runs on Adobe AIR. It's function is similar to TweetDeck, except that it use less memory. It uses Tabs they call canvases for different groups. You may also choose to view them in column view like in TweetDeck.
You can find it here: Click Here

HootSuite:


Similar function to Tweetdeck and DestroyTwitter, this runs on your web browser. This application allows you to manage multiple account on Facebook, Twitter plus some other social networks. There is also columns to help you to organize your accounts, replies and some direct message. It also gives you a custom URL shortener and also the feature of tracking the URL's. You can find HootSuite here: Click Here

Twitterrific:

This list wouldn't be complete if I didn't include a a paid premium service to users who do twitter marketing. The paid service can be downloaded on Mac and the free Twitterrific iPhone or iPad app is free.
You can find it here: Click Here

Twhirl:  

A desktop client that lets you manage multiple accounts by keeping windows open at the same time and also let you update different social media notifiers, such as Ping fm. This also allows you to update your status on Facebook, Myspace and LinkedIn.'
You can find it here: Click Here

That's all for this post. I would like to hear what application you use to monitor your twitter account for and feel free to drop a comment. 

Look out for our next Twitter series post which will be updated every Monday! Subscribe to us to be the first to read our next twitter series post!
Like this post? Take a minute to share this with everyone!
Hope you like it and enjoy!~


Next Twitter Series post #3 => What do you Tweet about?

Thursday, 5 July 2012

Advertisements? How much, is too much?


Advertisements, as everyone know, it is one way of generating revenue for your blog for the hard work you put into it and think you deserve some credit. Now, remember this one point, readers are here for your content, not your advertisements. If there are too many advertisements, it will direct or distract your readers to focus on those ads instead of your content. Which means it will be a waste of effort (unless you copy from other sites).


Know your limits:
Know your limits when having advertisements. Advertising companies like Google Adsense has strict policy on how many ads you can have and currently it is 3 ads per page, no more than that.
If you have other sort of advertising methods such as: 

  • Pop-Ups ads
  • Pop-Under Links ads
  • Text-links ads
  • Interstitial ads
  • Or even Survey ads
The ones above this list are not really recommended, other than Text-links ads. Unless your blog has really good content or established, these might not be a very good choice of advertising methods. In fact, if you are just starting, with little content, you will need to gain trust with your  audience by doing a "promise" that you will not abandon the blog. So even when your blog is flooded with ads, (Even for established sites not recommended) there will still be readers reading your blog.


Ads like Interstitial ads, pop-ups or pop-under ads and survey, drives visitor away from your blog. Especially unique visitors who are important for maintaining your blogs status.


Examples of Interstitial ads:
There are two types of interstitial ads, one of them is the one above, the other type is a something like a pop-up box, but more of a pop-up frame instead that obstructs the view of your visitors and will be required to click close or skip after a certain period of time in order to view the website's content. 

Companies offering interstitial ads:(Cost-Per-View or Cost-Per-Click or both)

Adf.ly: Click here to join (A link shrinker that redirects a user to view an ad before able to click 'skip ad' to skip it and redirect you to your blog/website.)

Clicksor:
They also offer pop-ups, pop-under, text links, banners and interstitial ads
Click Here to join.

Survey ads (Also known as Cost-per-action CPA)

Adscend Media:
Please note, that Adscend Media is different and totally not affiliated with Google Adsense in anyway. Adscend Media offers pop-up, interstitial, banner,survey advertising. A lot of file sharing site also took advantage of such sites by using a PHP script to force user to complete a survey in order to unlock a download. The famous Pay-Per-Action file sharing site is Sharecash. Adscend Media can be used to make users complte a survey to access a restricted page or a particular download. Very few barriers for entry, making this site very popular.

CPA Lead:
Example of CPA lead survey, CPA as the acronym suggests (Cost-Per-Action), it is purely for locking up content with a gateway lock. Users will have to fill up a survey in order to join.

These are the not very pleasant way of trying to make money on the web and at the same time expecting visitors to view them. Unless your content is extremely tempting for your users to download, otherwise no one will want to visit that webpage. Thus losing visitors.

Have you ever had experience with either of these site? Share you views and thoughts here by dropping a comment!

10 things you should do to get removed from search engines results !


Search Engine Rankings

Ten tips you should follow if you want to get removed from search engines.

1. Stuff your keywords (Recommended Method)

Stuff all of your keywords into the meta keywords section onto your blog/websites! Search engines won't ban you, but you will drop from 10000 to perhaps 50000000 in a blink of an eye, or even total removal from Google (Awesome). This can be achieved by having a keyword density of more than 10% per post (Roughly).

2. Hide keywords ( 2nd Runner up)
Start stuffing invisible text, in the bottom of your page! Stuff as many as possible and once the search engines finds it, you rank will drop by a significant amount of over a few million. (Works best with no.1)

3. Buy Links or publish links (Also known as Paid Links)
Another way of bringing down your search rankings is to sell tons of links through 3rd party services such as Text Link Broker without the "NoFollow" tag! Not only your rankings will go down, the advertiser who published the links will also go down with you! How great, two birds with one stone.

4. Sponsored Post (Sponsored Reviews)
Yay, let's make more money using paid posting! Make sure when you visit sites like PayPerPost, remember to make sure that the conditions is that you cannot add a "Nofollow" tag. Not only you will be able to make money with this method, your blog/website will immediately receive an invisible special alert from search engines, that will be your blog/website be totally removed from the search engine rankings. (Yay!!!)

5. Let's go Link-trading/building crazy shall we?

Yeah, let's make all of our time go to waste by spending time on doing link trading with websites/blog with topics different from us, this will ensure that not only do we waste a lot of time, at the same time, we see results! (No increase in rankings)


6. Including irrelevant links to external pages
Well, this sure is good, having tons of external links that are totally irrelevant not only drives readers away from your blog, your search engine rankings won't increase. So remember, stuff tons of external links onto your blog/website to ensure maximum distraction to your readers!

7. Search Companies that offer instant results for search engine optimization
If you have a lot of money and have no idea where to waste, it is recommended that you go to companies that offer instant results for search engine optimization, research and reviews are not required. Also go to companies that does link farming, this will ensure that your website/blog will have an extremely drastic effect which you intended and get pulled down on your rankings. A great way to spend your money on.

8. Let's start a scraper site! (For more information visit this Link)
Copy content from almost every website/blog you visit and directly copy them over! After a while once the webmasters found out that you have copied from them, you will not only receive a special attention from them, but also on the hands of the law (Great, I have always wanted to visit the supreme court once). So, remember to copy as much as possible in order to ensure that you will spend quality time, in the court, answering to your actions, I can ensure you that it will be an experience of a lifetime.


9. Limiting your efforts on Google
Good idea, let's lose the other 34.9% potential audience onto our website/blog to ensure that our blog/website climb slowly and smoothly though the ranks the search engine.


10. Let's give up!
Let's give up! We have already build up an archive of post of about 20, so let's just abandon it and stuff it with advertisements! Not only will we be able to make little money, we will also lose tons of traffic across the internet!


Enjoy my sarcastic recommendations? Remember, if you would like to achieve an opposite of the intended effect of this post, remember to do the exact opposite!


Have any comments or feedbacks? Drop them here! I would like to hear what you have to say.

Saturday, 30 June 2012

Google Chrome Shortcut Keys


Well, as the post title implies, I am going to share with you ALL (yes all) of Google Chrome's shortcut keys. Useful if you learn them as they can save you the hassle of clicking around and trying to find you way around the browser.

Here is a list of them:

CTRL + SHIFT + N : automatically opens up a Chrome ‘incognito’ window which allows you to surf on a PC without leaving behind any digital footprints.
SHIFT + Escape: allows for fast access to Chrome’s task Manager utility that allows you to nix browser processes that have gone awry.
CTRL + SHIFT + T: will open recently closed browser tabs.
Ctrl+N – Open a new window
Ctrl+Shift+N – Open a new window in incognito mode
Press Ctrl,and click a link – Open link in a new tab
Press Shift, and click a link – Open link in a new window
Alt+F4 - Close current window
Ctrl+T - Open a new tab

Ctrl+Shift+T – Reopen the last tab you’ve closed. Google Chrome remembers the last 10 tabs you’ve closed.
Drag link to tab – Open link in specified tab
Drag link to space between tabs – Open link in a new tab in the specified position on the tab strip
Ctrl+1 through Ctrl+8 – Switch to the tab at the specified position number. The number you press represents a position on the tab strip.
Ctrl+9 – Switch to the last tab
Ctrl+Tab or Ctrl+PgDown – Switch to the next tab
Ctrl+Shift+Tab or Ctrl+PgUp – Switch to the previous tab
Ctrl+W or Ctrl+F4 – Close current tab or pop-up
Alt+Home – Open your homepage
Ctrl+O, then select file – Open a file from your computer in Google Chrome


Ctrl+P – Print your current page
F5 – Reload current page
Esc – Stop page loading
Ctrl+F5 or Shift+F5 – Reload current page, ignoring cached content
Press Alt, and click a link – Download link
Ctrl+F – Open find-in-page box
Ctrl+G or F3 – Find next match for your input in the find-in-page box
Ctrl+Shift+G or Shift+F3 – Find previous match for your input in the find-in-page box
Ctrl+U – View source
Drag link to bookmarks bar – Bookmark the link
Ctrl+D – Bookmark your current webpage
Ctrl++ – Make text larger
Ctrl+- – Make text smaller
Ctrl+0 – Return to normal text size


Ctrl+B – Toggle bookmarks bar on and off
Ctrl+H – View the History page
Ctrl+J – View the Downloads page
Shift+Escape – View the Task manager


Hope you like it and enjoy. If you like it, please help us by taking a minute of your time to share it with your friends and everyone else as well as subscribing to us for more post!

Friday, 15 June 2012

How to change your IP address


This only changes your dynamic IP address. Static IP address can still be traced by following the IP. Please take note of this before even trying to attempt it. If your IP address is A dynamic IP address, then this shouldn't be much of a problem. 


1. Click on "Start" in the bottom left hand corner of screen
2. Click on "Run"
3. Type in "command" and hit ok


You should now be at an MSDOS prompt screen.


4. Type "ipconfig /release" just like that, and hit "enter"
5. Type "exit" and leave the prompt
6. Right-click on "Network Places" or "My Network Places" on your desktop.
7. Click on "properties"


You should now be on a screen with something titled "Local Area Connection", or something close to that, and, if you have a network hooked up, all of your other networks.


8. Right click on "Local Area Connection" and click "properties"
9. Double-click on the "Internet Protocol (TCP/IP)" from the list under the "General" tab
10. Click on "Use the following IP address" under the "General" tab
11. Create an IP address (It doesn't matter what it is. I just type 1 and 2 until i fill the area up).
12. Press "Tab" and it should automatically fill in the "Subnet Mask" section with default numbers.
13. Hit the "Ok" button here
14. Hit the "Ok" button again


You should now be back to the "Local Area Connection" screen.


15. Right-click back on "Local Area Connection" and go to properties again.
16. Go back to the "TCP/IP" settings
17. This time, select "Obtain an IP address automatically"
tongue.gif 18. Hit "Ok"
19. Hit "Ok" again


Hope you enjoy this post and have a nice day!

Creating an email button on your blog!

This is going to be a quick short easy tutorial to those whom might want to add a "Contact Page" for your users. Of course using this method you might risk being spammed. However this hasn't stopped people from using it. They show their email big and wide when they can just include a link for people to email them, instead of being so plain, why not add some interactivity to your blog by adding a button to link to your email instead?.


Here's a demo on how it looks like:

Free Email Button


This is the simple html script you will use to create this button:
<Form><Input type="button" Value="Click Here to Write to Me"onClick="parent.location='mailto:whateveryouemailis@gmail.com'">
<a href="http://xxrazexblog.blogspot.com/" target="_blank"><span style="font-size: xx-small;">Free Email Button</span></a><br /></Form>
A breakdown on what they mean:
<form> - What this does is to create a form space to add your button
<Input type="button"> - Should be self explanatory, add a button to the form space
Value="   " - Whatever you want to write.
onClick - The event that will happen once clicked.


The extra code at the back is only if you would like to thank us and leave a link to my blog.


Simple enough to understand? People use these html code to add interactivity to their website or blog. Something like an enhancement. However, let me reiterate my previous statement that this will risk you email to other users whom might want to spam you. So it will be best if you create a separate email solely for your blog. Creating email is free and easy.


Like this post? Take a minute to share them with your friends on Facebook or tweet it to twitter. I will also appreciate if you subscribe to us :)

Tuesday, 5 June 2012

How to generate a direct link for a torrent file

Today, we will be sharing with you another useful trick is to download Torrents directly. At the same time, you can also download it to your favorite download manager such as Internet Download Manager (Paid will post a free version of this) or the free download manager FlashGet.
Click Here to visit ZbigZ

  • First go to any torrent link that you will like to download 
  • Next paste that torrent link and click on Go Free button to download using any download manager that you have.
  • Wait a few seconds and your download link will be available and you can download it via whatever download manager you have instead of using bittorrent or utorrent.
That's it for this post, if you like it, please spare a minute of your time sharing this with everyone. You can also subscribe to us to receive the latest updates!

Sunday, 27 May 2012

How to bypass CPA Lead Survey [Updated]


Yea, as said CPA lead helps web owners or blog owner earn some cash by visiting their website and filling out surveys. This can be quite annoying to some people in a sense. So, I am going to introduce to you a bypassing script to the website.


The bookmarklet can be found here: Click Here 


Watch the video below to find out how to use:


I hope you liked it and subscribe to our blog for more. Help us share our blog as well, we will really appreciate it!

Monday, 21 May 2012

A WordPress Menu Tab style widget for Blogger!

Interested in adding a Menu Tab to Blogger/ Then try the WordPress Menu Tab style like the one I have:

My template is a WordPress converted to blogger template, so I will have this by default. But some normal blogger template won't have them so I am going to share with you now.
It is now possible and I am going to teach you how:
Note: Before doing such changes, it is recommended that you backup your template first.


1st Step: Adding Jquery and JavaScript to your blogger template  

  • Go To Blogger > Design > Edit HTML
  • Search for ]]></b:skin>
  • Just below it paste the following code:  Download it here

2nd Step: Adding CSS to your Tab:
-Search for  ]]></b:skin> and paste it above this code
Copy the script below:
/*---- Wordpress Style Menu Tabs----*/
.MBT-tabs{list-style:none;list-style-type:none;margin:0 0 10px 0;padding:0;height:26px}
.MBT-tabs li{list-style:none;list-style-type:none;margin:0 0 0 4px;padding:0;float:left}
.MBT-tabs li:first-child{margin:0}
.MBT-tabs li a{color:#fff;background:#333333;padding:5px 5px;display:block;text-decoration:none;font:bold 12px Arial,Helvetica,Sans-serif;}
.MBT-tabs li a:hover,.MBT-tabs li a.MBT-tabs-current{background:#F84444;color:#fff;text-decoration:none}
.MBT-tabs-content{background:#212121}
.MBT-tabviewsection{margin-top:10px;margin-bottom:10px;}
Change the red highlighted color to the color of your choosing. You can find a color hex code generator here: Click Here

3rd Step:
Good now we are done with the CSS, let add the HTML code for our tab:

  • Ensure that the "Expand Widget box" is unchecked
  • Then Search for the following code:  <div id='sidebar-wrapper'>
  • Paste the following code below  <div id='sidebar-wrapper'>


<div class='MBT-tabviewsection'>
<script type='text/javascript'> 
            jQuery(document).ready(function($){ 
                $(&quot;.MBT-tabs-content-widget-MBT-id&quot;).hide(); 
                $(&quot;ul.MBT-tabs-widget-MBT-id li:first a&quot;).addClass(&quot;MBT-tabs-current&quot;).show(); 
                $(&quot;.MBT-tabs-content-widget-MBT-id:first&quot;).show(); 
                $(&quot;ul.MBT-tabs-widget-MBT-id li a&quot;).click(function() { 
                    $(&quot;ul.MBT-tabs-widget-MBT-id li a&quot;).removeClass(&quot;MBT-tabs-current a&quot;); 
                    $(this).addClass(&quot;MBT-tabs-current&quot;); 
                    $(&quot;.MBT-tabs-content-widget-MBT-id&quot;).hide(); 
                    var activeTab = $(this).attr(&quot;href&quot;); 
                    $(activeTab).fadeIn(); 
                    return false; 
                }); 
            }); 
        </script>
<ul class='MBT-tabs MBT-tabs-widget-MBT-id'> 
<li><a href='#widget-MBT-id1'>Subscribe</a></li> 
<li><a href='#widget-MBT-id2'>Latest Tricks</a></li> 
<li><a href='#widget-MBT-id3'>Search</a></li> 
</ul>
<div class='MBT-tabs-content MBT-tabs-content-widget-MBT-id' id='widget-MBT-id1'> 
<b:section class='sidebar' id='sidebartab1' preferred='yes'> 
</b:section>                                       
</div>   
<div style='clear:both;'/>                        
<div class='MBT-tabs-content MBT-tabs-content-widget-MBT-id' id='widget-MBT-id2'> 
<b:section class='sidebar' id='sidebartab2' preferred='yes'> 
</b:section>                                         
</div>   
                        
<div style='clear:both;'/> 
<div class='MBT-tabs-content MBT-tabs-content-widget-MBT-id' id='widget-MBT-id3'> 
<b:section class='sidebar' id='sidebartab3' preferred='yes'> 
</b:section>                                        
</div>
</div> 
<div style='clear:both;'/>
Change the Red highlighted text to whatever you want. 


Now that you are done with that, go to Layouts and you will find this:
They are all in order, the look at the top "popular" and "follow and like us". They are placed in order and they will be how your widgets be placed. It's that simple!

Have any question or queries? Drop a comment below and I'll be happy to help you!
Enjoy~

Saturday, 19 May 2012

TurboBit, Letitbit, and Rapidshare Premium Generator [Updated]


We are here to share with you another way to share with you a premium link generator.
This premium link generator can generate links from these few website. 

                                                      rapidshare premium link


  • TurboBit
  • Letitbit
  • RapidShare

First go to this link: Click Here

The website is in Russian, so I will guide you to how to link to the section.

-Go to the blank box, add in you download link to either of these links.
-After that, click on the blue button beside the safebox like picture.
-Once your premium link has been generated. Click on the green button and the download will begin.

Hope you like this post and comment. Thank you and have nice day.
Don't forget to G+1 this and share it with everyone!


Most wanted post: How to use premium cookies Subscribe to our feed if you would like to receive updates from us!--------------------------------->

X
~